Hybrid Apps come with a consistent look-n-feel across web and mobile devices. They are easy to build, roll-out, upgrade and maintain.
Steps to Generate Hybrid Apps
Refer Getting Started, if your EdgeReady Apps or Login Apps are not yet published.
1. Entering App Information
In the deployment section, the user clicks the +New button to generate a new Container App.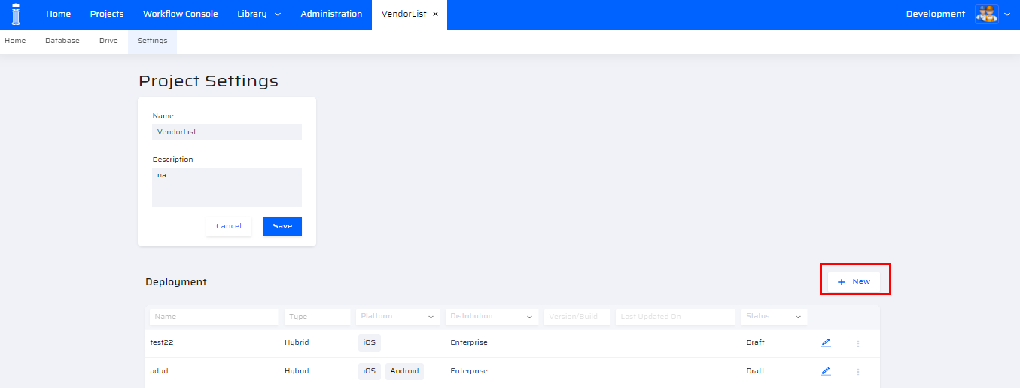 The following popup appears:
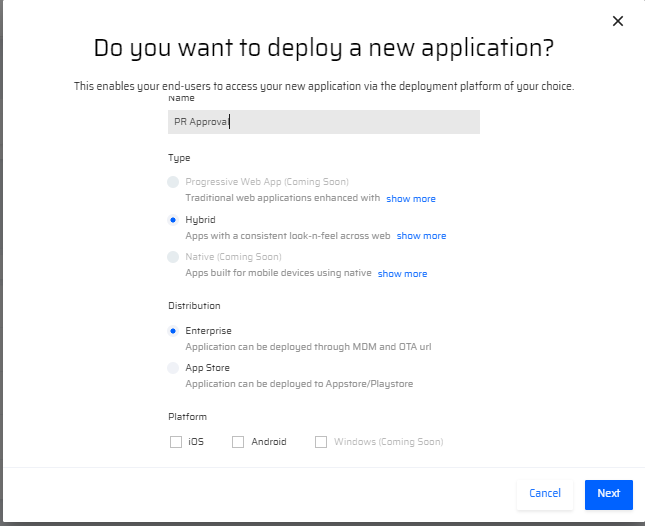
The deployment popup screen requests the following details. These details are critical to embed the EdgeReady App into the respective Mobile App.
- Name of the App - The Name that is visible on the device screen for the users.
- Type of App - Whether the App is a Progressive Web App,a Hybrid App or a Native App.
- Progressive Web App are traditional web applications enhanced with modern web technologies to have a more app-like experience
- Hybrid Applications are built using HTML web screens (HTML/CSS Javascript) and are rendered into the device. The UI/UX will be similar across all mobile and web applications.
- Native Applications are Apps designed for a particular device (based on the OS).
- Distribution Type - Whether the App is an Enterprise Application (belonging to a particular organization accessed through MDM or OTA url) or a Store App (that can be accessed as a 3rd party App from an App Store or Play Store by users outside the organization.)
- Platform Type - Refers to whether the App belongs to Android OS, iOS or Windows OS.
2. Entering App Identifier, Version & Build Number with Icon
After entering the basic information about the container app, the following screens request for more details about the App.
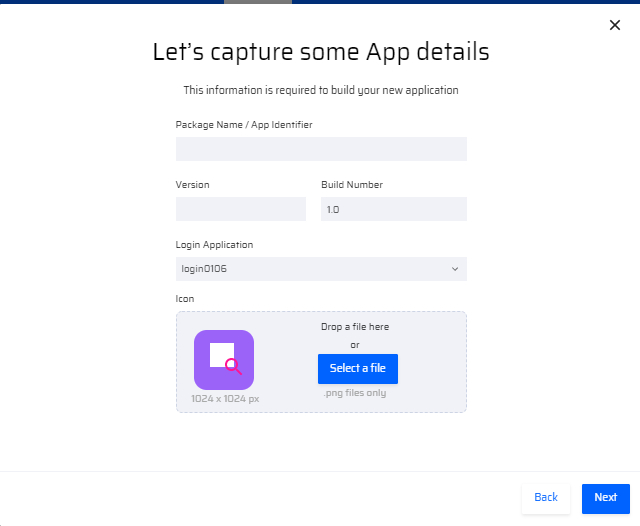
- App Identifier - The unique identifier given to the App for a particular project within an organization. It is used to universally identify a particular application from a pool of applications. It is an Apple Inc., recommended procedure that distinguishes one organization’s application from another. Although App Identifier is not mandatory, it is highly recommended. The general format for App Identifier is com.companyname.appnameNoteAlthough upper case names are permissible, it is recommended to use lower case names for a container app Package Name/App Identifier.
- Version - Version of the App created. Version is available only for the Apps that are released and fully functional.
- Build Number - Number of iterations (build) a particular app has undergone within a single version. Build Number changes for every change that is made to a particular app in the production stage itself.
- Login Application - A Default Login App or a customized Login app is selected from the dropdown list. When the container app is generated, the chosen login app(micro app) is packaged along with it.
- App Icon - Refers to the Icon for the particular container app that is visible on the mobile device. It has to be of resolution 1024*1024 pixels in .png format.
3. Selecting the EdgeReady Applications & Master Tables
- Once all the details are entered, the user clicks Next. The following screen appears:
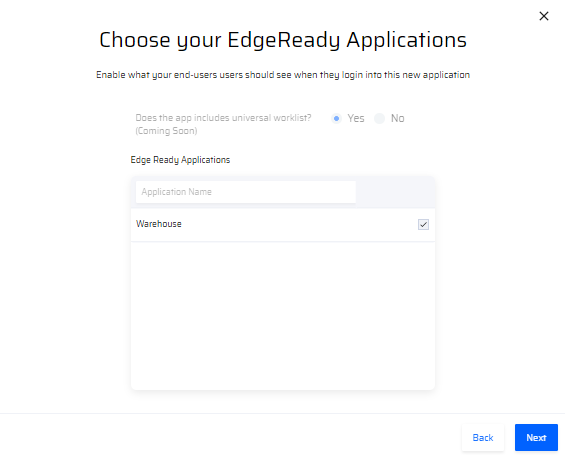
- The user can select a list of EdgeReady apps(micro apps) that should be packaged along with the container app. They can be selected from the list of apps displayed in the box. The list displays the EdgeReady Apps that are particularly published under a specific Project within a specific Tenant ID.
- Additionally, the user can choose whether the container app consists of a Universal worklist or not. (It is available only for workflow apps. By default, a non-workflow app cannot have a universal worklist).
- Once the EdgeReady App(s) are selected, the user clicks Next. In the next popup, the Master Table details are selected.
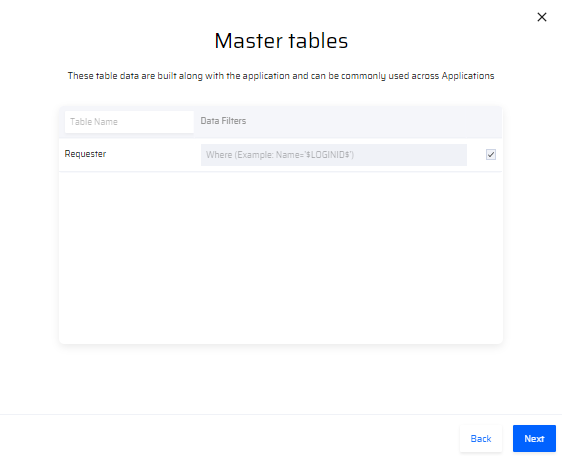
- Master tables refer to the tables from the database that are packaged along with the container app and all the EdgeReady Apps inside it. Master tables consist of the data that is accessed across all EdgeReady Apps.
4. Device Permissions, External Links and External Accessories
Once the master table details are created, the device permissions are set. Based on the nature of the mobile app, certain permissions are requested from the user.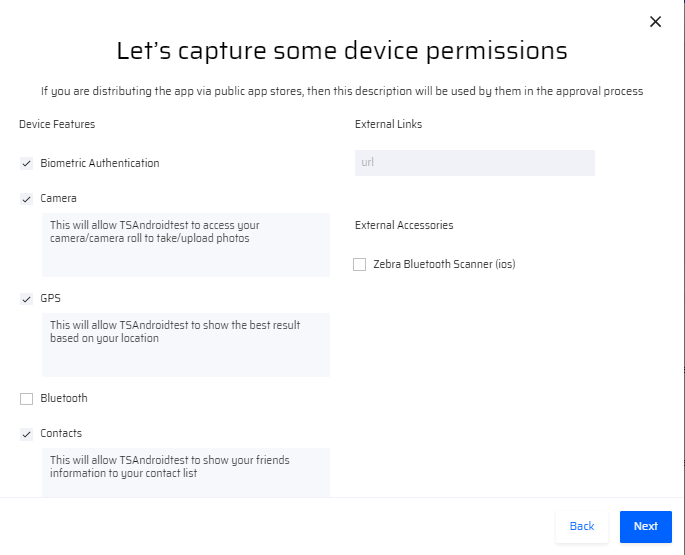
On selecting the checkbox, a short description is entered stating the reason for requesting the access for the particular feature. This message is displayed on the UI for the user in order to grant permissions.
External Links - All the links that are accessed by the user from within the App are provided in this section. More links can be added and removed as required. Apart from the links provided here, the EdgeReady App does not support any other external links from within the App.
External Accessories - If your app is deployed on a zebra device, select the Zebra Bluetooth Scanner checkbox. The following Zebra scanner versions are supported:
- CS6080
- DS2278
- DS3678
- LI3678
- DS8178
- Currently, the Zebra Bluetooth Scanner is supported only for iOS devices.
- For iOS devices, by selecting the Zebra Bluetooth Scanner, the Bluetooth checkbox also gets selected automatically.
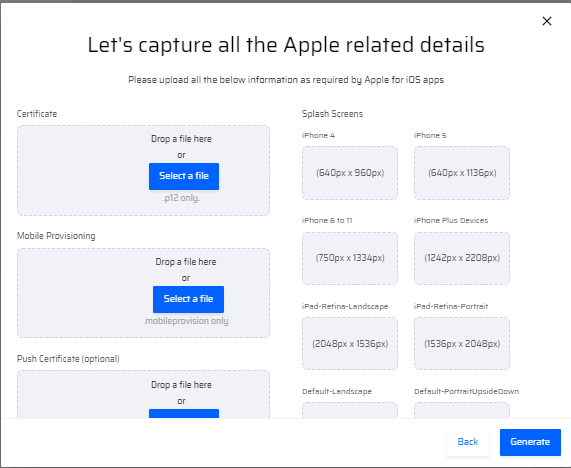
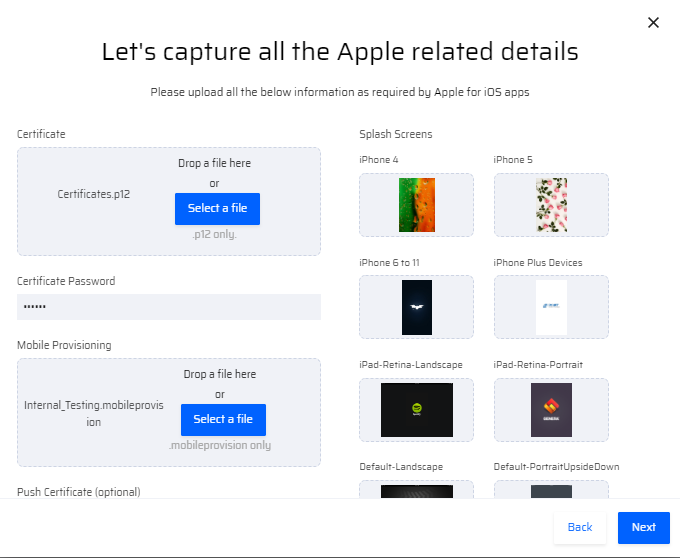
5. Certificates and Splash Screens
Before publishing the application in the Enterprise or the App Store, certain Certificates along with the Certificate Password have to be provided in the Mobile App.
We require different certificates for Apps designed for Enterprise or App stores. Additionally, we also need Splash screens (screens that intermediately appear when the pages within the apps are loading). These splash screens must be uploaded in specific sizes as mentioned in the screen below:
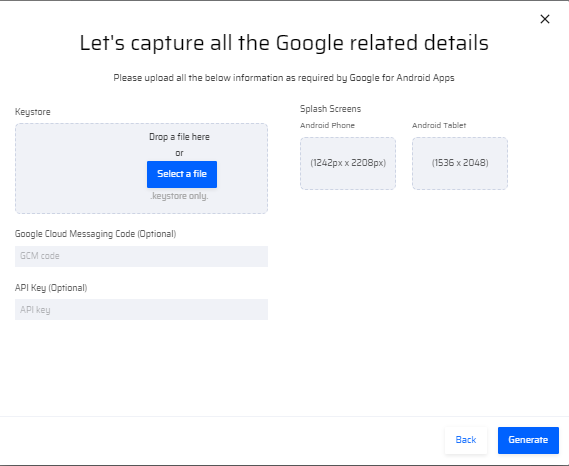 |  |
- For Android applications, the certificates require a keystore access as well as Google Cloud messaging code (for generating a push notification) with API key.
- For Enterprise applications, certificates are uploaded depending on the platform in which they are deployed. These applications can be accessed by an MDM or OTA URL.
Once the certificates & Splash screens are uploaded, the screen appears as follows:
 | 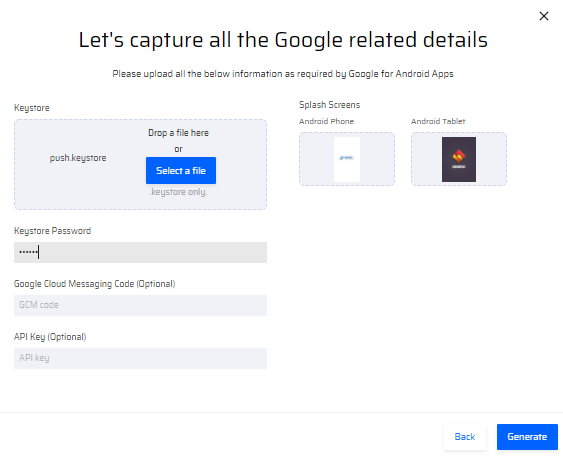 |
These certificates and splash screens need to be provided for both enterprise and app store applications in order to generate the Mobile apps. Enterprise apps require an enterprise certificate while the appstore/playstore requires their respective certificates from either the iStore(Apple) or Keystore (Google). Ideally, the certificates and Splash screens are provided by the customer.
6. Generating the App
Once these certificates are uploaded, the user clicks Generate. The application is ready to be downloaded and the App can be rendered as an .apk file for android and .ipa file for iOS. When the pending status changes to "Finished", the ellipsis menu has the following options: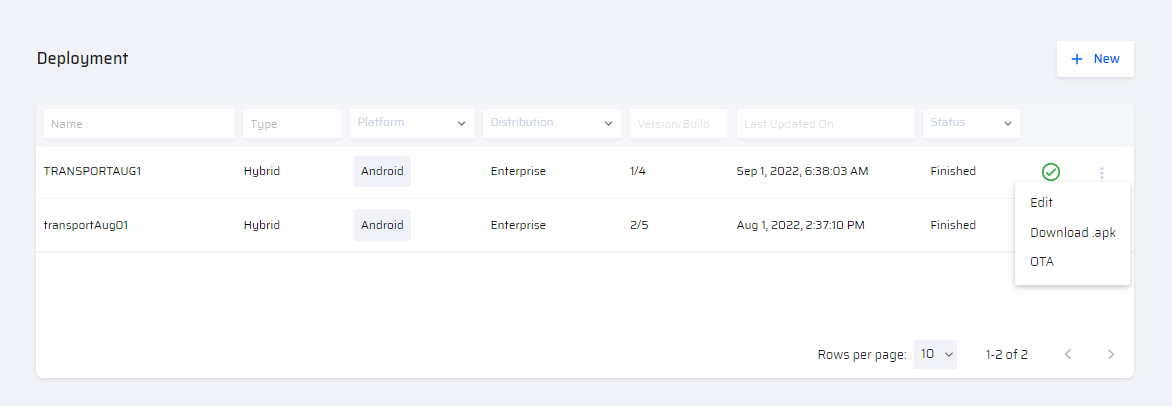
- Edit - Modify app information in any of the screens. After editing, regenerate the container app to reflect any changes made to the app information.
- Download .apk - App is download as "app.apk" zip file
- OTA - The following OTA Installation screen is displayed. The QR code to download app is available
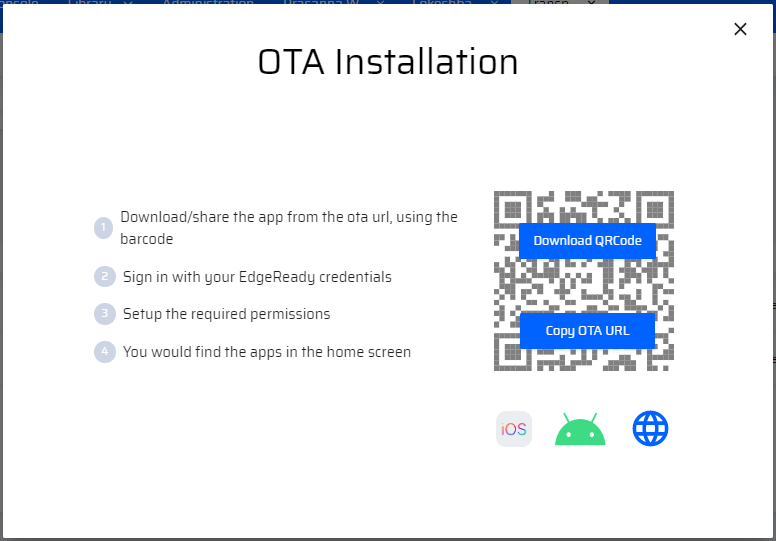 The OTA URL or QR code can be used to install the mobile app in a device or to access the web app through a browser(Chrome, Safari, etc.). Both provide the user, access to all the EdgeReady Apps in it.